Under the Hood: Raspberry Pi System

Overview

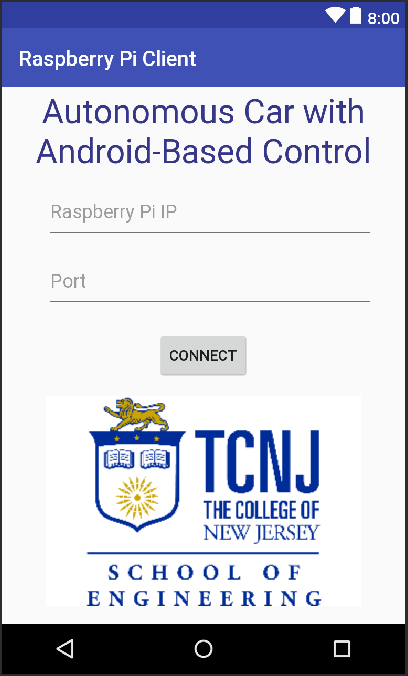
The Raspberry Pi is the control computer on the car.  Using a python script, the raspberry pi will perform the PID control and obstacle avoidance algorithms and send instructions to the Arduino Mega.  The raspberry pi also acts as the bridge for a user controlled Android app and the car.

It was decided to use a wifi connection to connect the Android and the Raspberry Pi.  This provides a secure connection that is faster than bluetooth and be configured to our needs.  Using the school’s wifi network is an option, however, setting up the Raspberry Pi as the access point is the ideal approach.  Using the Raspberry Pi as the wifi host allows us to connect directly to the Raspberry Pi and not use a 3rd party to establish the connection.  To do this the HOSTAPD and DNSMASQ libraries were installed.

Communicating with Android Phone

To communicate with the Android device the socket library was needed.  This allows us to create a socket and read or write to it. Once the data is read from the socket, the python script decodes it from UTF-8 to interpret the message.  This was done by sending a string of 2 numbers, the first one identified left right or both and the second identified if were turning it on. So 11 meant turn left, 21 meant turn right, 31 meant move forward and 30 meant stop. Once these interpretations are read in from the socket a conditional is then used to determine which function to use.

Bridging the Arduino and Android

The Android device writes to the socket and then the python script reads this, decodes and interprets the command as turn left, turn right start or stop.  It then calls the respective function which translates to telling the Arduino what LEDs to turn on, flash or turn off. In this loop, if the Android device ever disconnect from the Raspberry Pi, the script goes to a stop the car state and then the script stops execution.

Run Time Changes

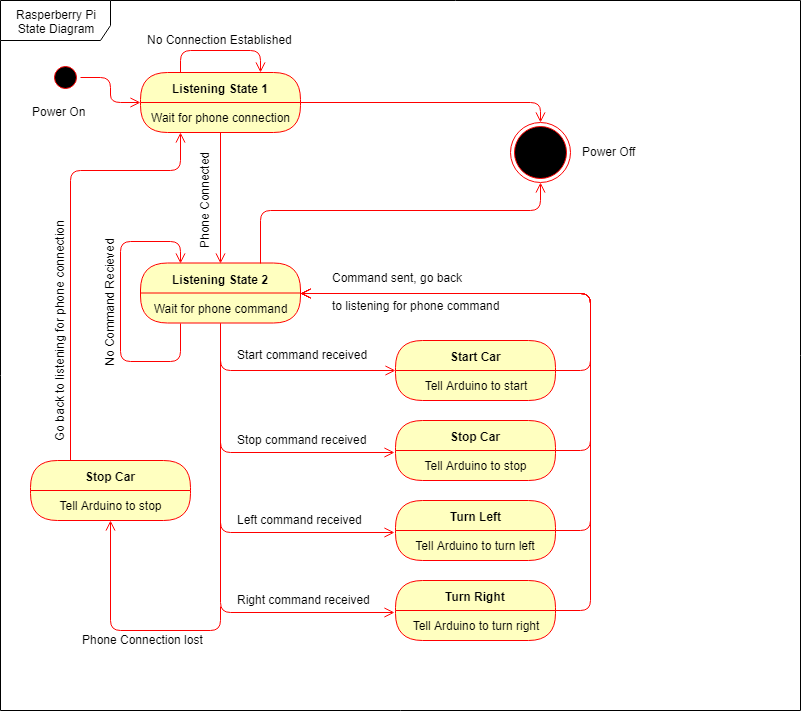
The first step was making it always run since the script stopped after the Android device disconnected.  So when a phone disconnects, instead of stopping the script, it goes back into a listening state where it waits for a phone connection. The last step was making the script run as soon as the Raspberry Pi was turned on.  In order to meet the constraints, the terminal was created and stored it in an autoStart folder in the Raspberry Pi’s .config folder. The last thing added was a log file that time stamped each operation performed so after several runs the team can debug any issues that occured.

Under the Hood: Android Application

To design and develop an Android application the Android Studio integrated development environment (IDE) version 3.0 was used.

Manifest and Backend

The app manifests file tells the Android operating system what activity to run, what activity to display, what backend program to use, and run the main intent. This file tells the Android operating system to run the MainActivity. The backend of the MainActivity is defined within the file MainActivity.java.

The backend to the MainActivity  reacts once the MainActivity is created, once created the backend waits for the Connect Button to be pressed using .setOnClickListener(). This function will override once a button click is detected. Once the click event is detected, a Client object is created from the verified IP address and Port number. This Client object then creates a unique Socket object to send encoded information over a user specified port number. If a successful socket is created, the Connect Button color is reset to green to notify the user of a successful connection being made. The parameters by default are set to 192.168.4.1 and 22, this is the IP address and available port number of the Raspberry Pi used during development and testing.

Once a successful connection is made, the user is then able to press the forward arrow ImageButton to send a forward instruction and then any combination of left and right arrow ImageButtons may be pressed. This will toggle the on/off ToggleButton, notifying the user that the autonomous car is in the process of performing a motion. In order to send an encoded forward instruction, an ObjectOutputStream object is created. This will allow the user to send information over an available port on the Raspberry Pi.

The information sent over the port is encoded using the UTF-8 encoding standard. The instructions set by the user are sent as an integer: 1 to indicate right, 2 to indicate left, and 3 to indicate forward (on) or off. This integer is sent along with a one or zero to indicate a stop instruction or go instruction. These bit streams are then sent over the port to be sent to the Raspberry Pi that is listening over the same port.

Secondary Activity

This SecondaryActivity activity is created after a successful connection is made with a Raspberry Pi. This activity serves as a main menu for the user, giving them the following options: remote control, set instructions, previous runs, disconnect, and more. Each of these options are represented within the activity as a Button component. Each Button component is listening for an onClick motion event that will bring the user to a new activity.

Remote Activity

The RemoteActivity activity is created after the Remote Control Button is pressed. This activity will contain a stream WebView and start_stop, f, l, r, b Buttons. To allow for a Button overlay, a layered layout needed to be created. To do this, a Relative Layout was placed within a Relative Layout. The outer Relative Layout contained the stream Webview and the inner Relative Layout contained all Buttons.


Senior Project I Demo

Last semester, we presented our completed communication system in physical hardware:

The system consisted of the Android application connected to the Raspberry Pi via WiFi, which had a serial connection to the Arduino. This setup allowed us to show users that the Arduino could connect to proximity sensors and relay information back to the application. The proximity sensor was used to “sense” an obstruction, which then turned off the LEDs being powered from the Arduino, which then relayed changes to the application screen.